This post may contain affiliate links. This blog generates income via ads.

There’s no “Pinterest Fail” in sight with this in-depth, step-by-step recipe for the traditional Easter Lamb Cake Recipe! It will wow and impress your family, friends, and strangers on the internet! Don't forget to check out the video tutorial below.
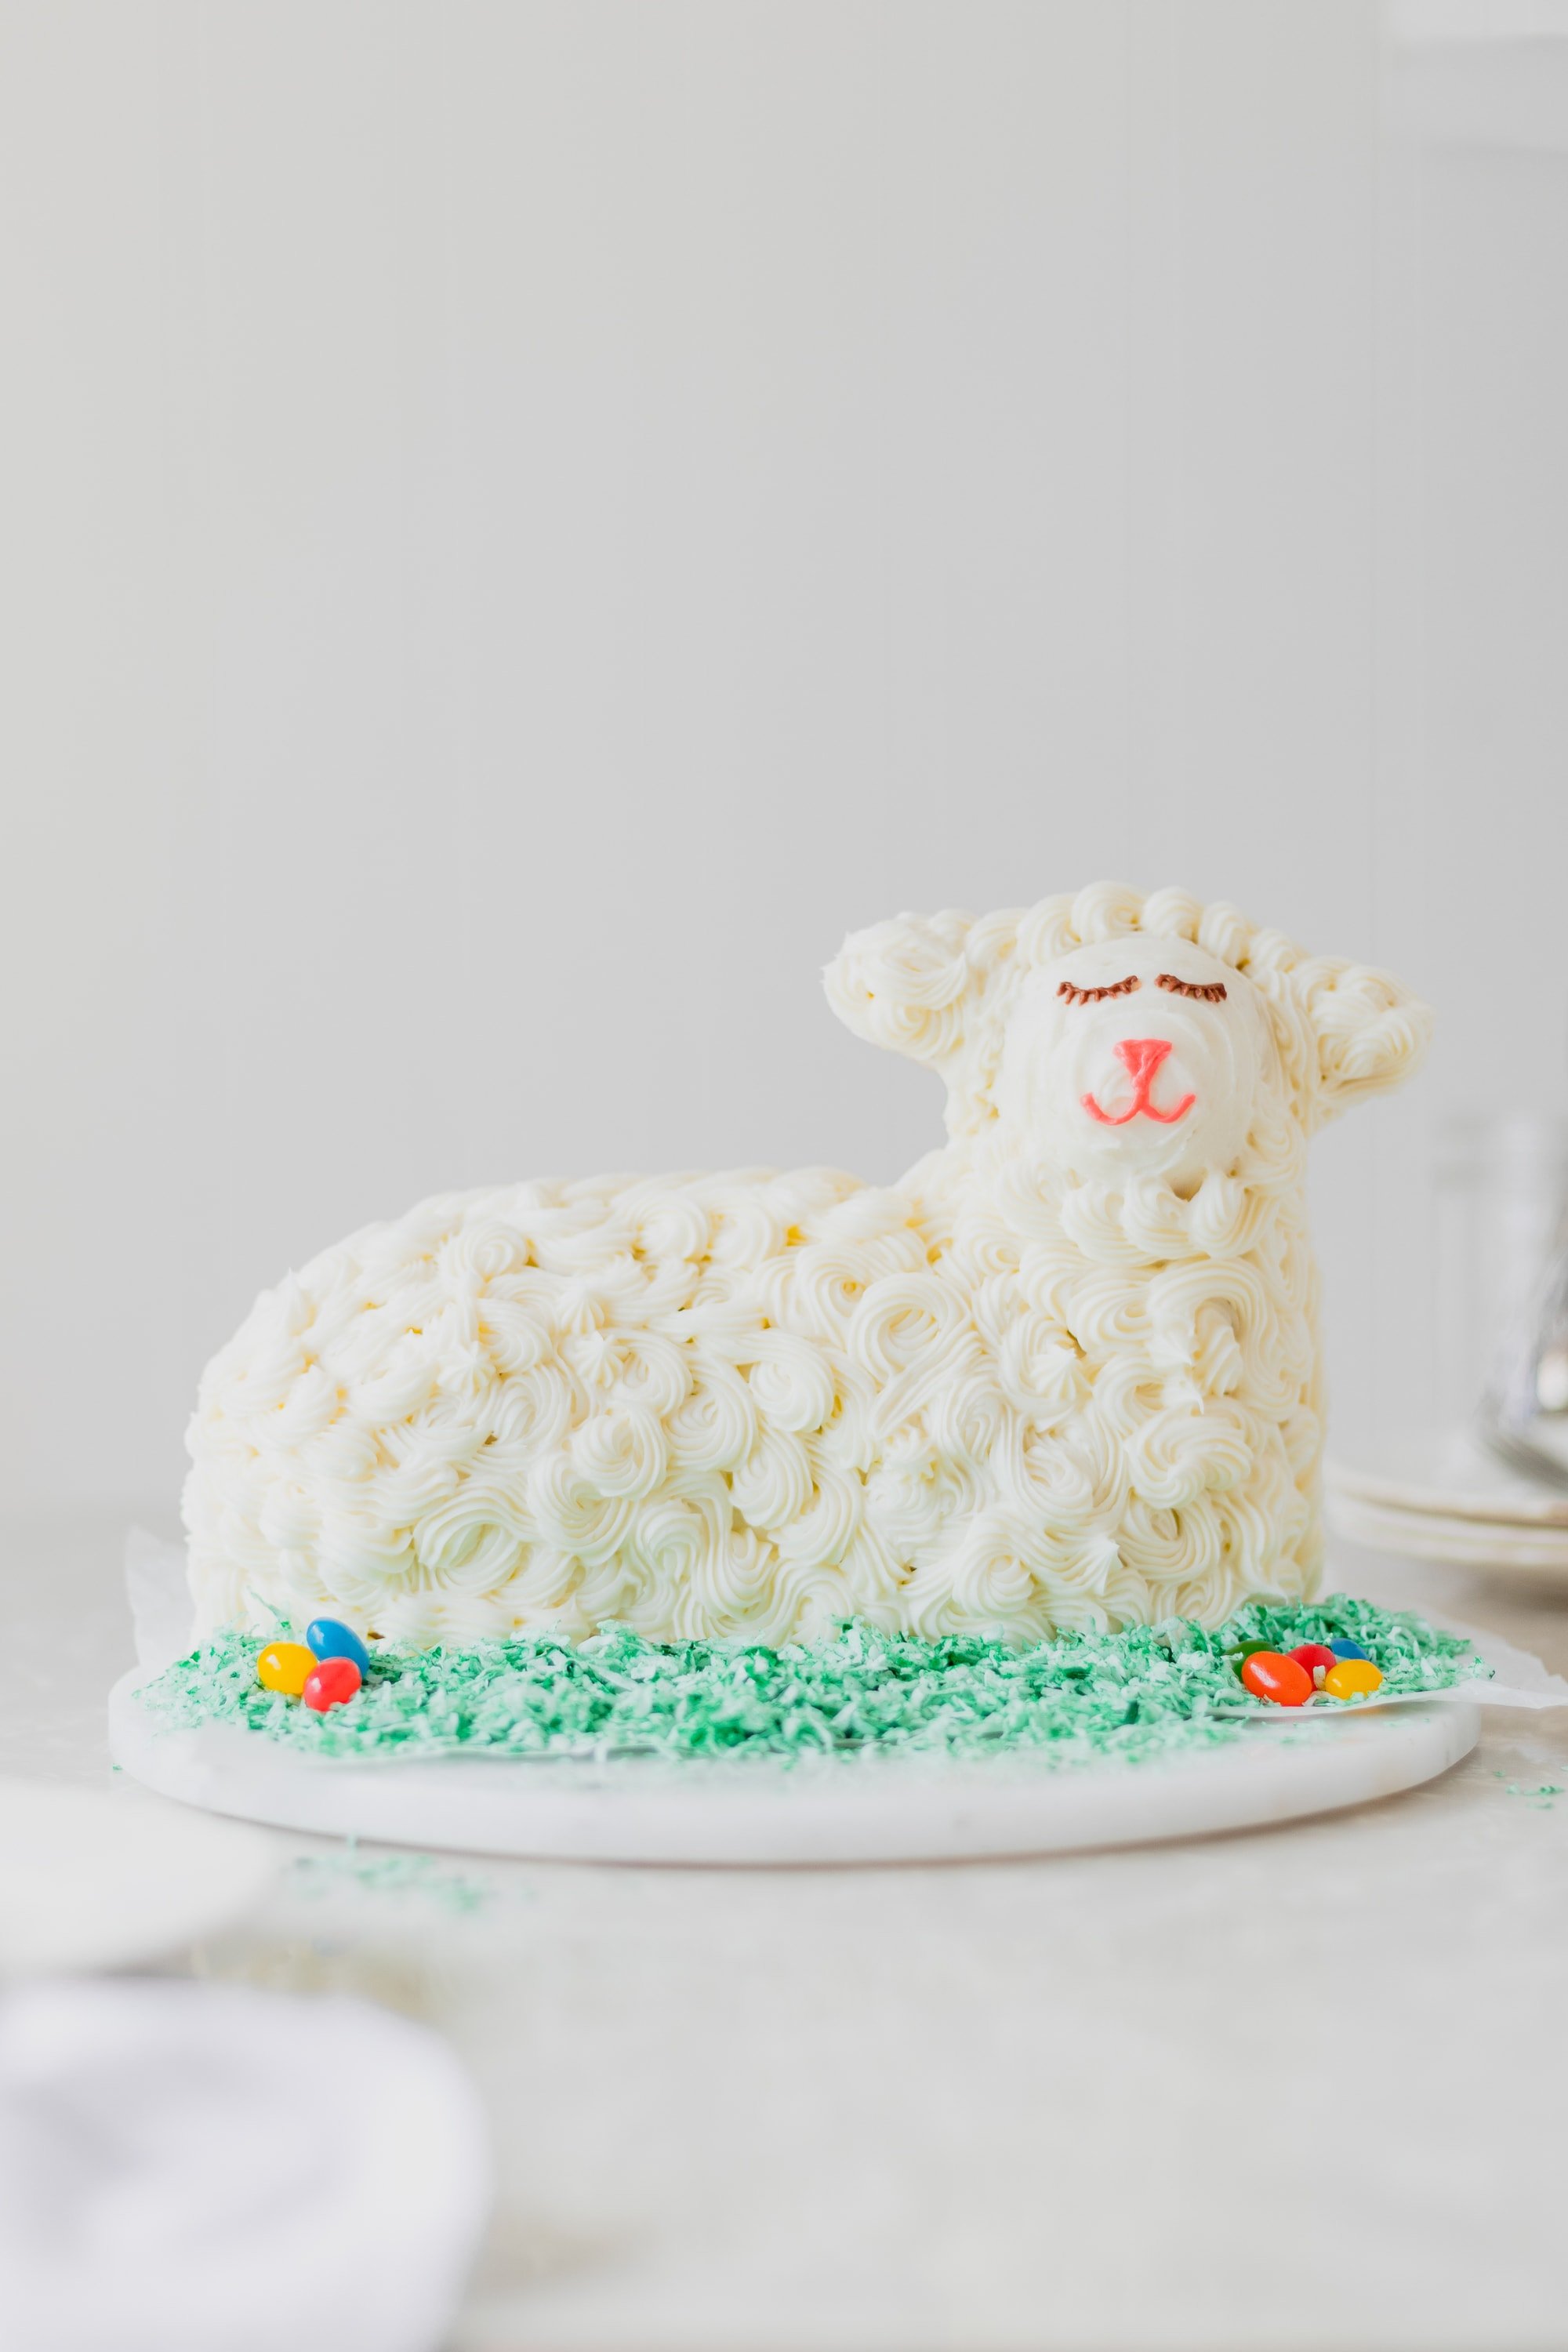
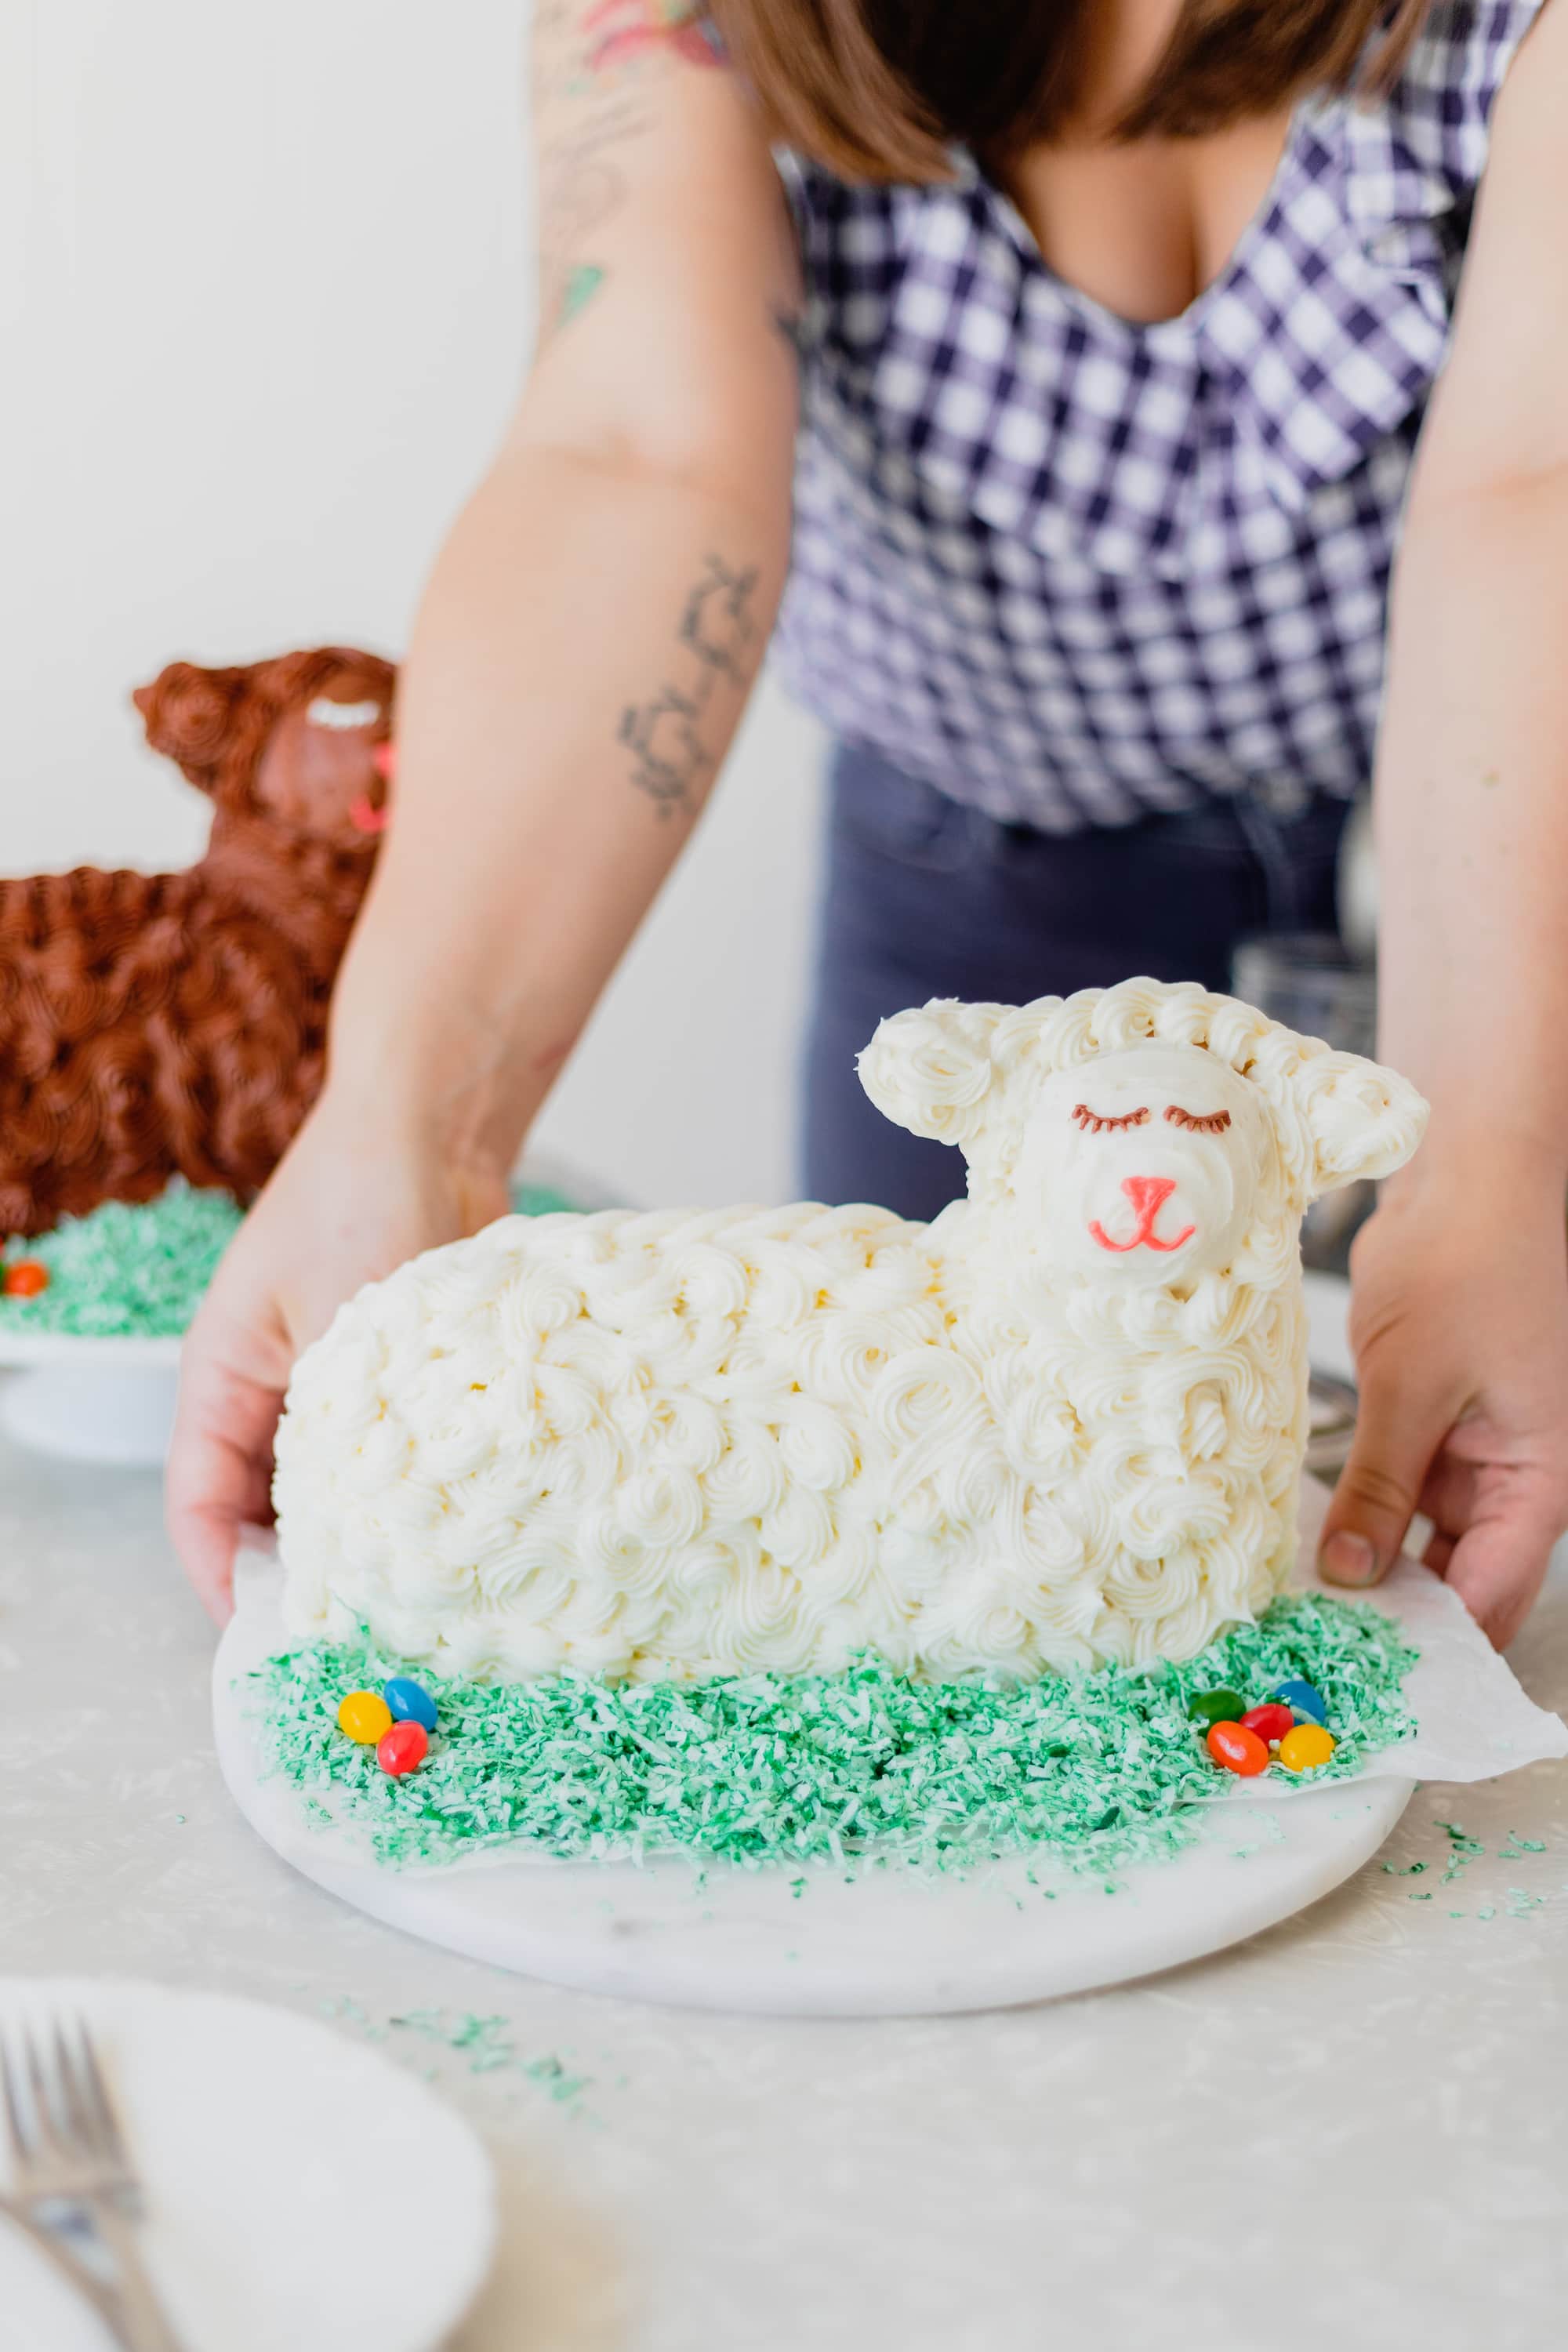
A tender white cake is baked in a lamb-shaped, two-sided mold. It then gets frosted, decorated, and served with festive Easter decorations that bring this holiday classic to life!
Tools Needed for this Recipe
- Cake mold – First and foremost, you’ll need a two-sided mold that provides you with the front half and back half of your lamb. Mine was given to me by my grandma, but I have seen many of them in thrift stores and even brand new online.
- Toothpicks – One of my secret weapons from preparing a perfect lamb cake!
- Baker’s Twine – Another secret weapon!
- Aluminum Foil – The final weapon in our arsenal that will ensure culinary perfection for the little lamb.

Prepare the pan
We all know about buttering and flouring our cake pans before baking, right? Well, I’m here today to tell you to forget about that nonsense! That’s right, you heard me. Ignore them.
Instead, we’ll be coating our lamb molds in generous layer of cooking spray and a dusting of granulated sugar.

Yes, sugar! It melts into the cake and pulls it away from the pan and when you remove the mold you’re left with this brilliantly glossy, sugar coated cake that’s ripe for the picking.

Preparing the Cake Batter
This is just a brief overview, detailed instructions can be found in the recipe card below!
- You’ll whisk together the dry ingredients and set ‘em side.
- Then, whip your egg whites to medium peaks and set those aside, too.
- Cream together shortening and sugar, adding egg yolks and vanilla.
- Continue with the dry-wet-dry addition of the flour mixture and room temperature milk.
- Finish off the batter by gently folding in the egg whites.

Baking the Lamb Cake
Place the (sprayed and sugared) front half of the lamb cake mold face down on a baking tray. Why face down?
Because this ensures that during baking the cake will fill the entire front half of the mold. That means, no matter what you’ll have a pretty little lamb face to decorate.
Baking the cake on its back can result in a face-less lamb. Nobody wants that.
Fill the front half of the mold full of cake batter. And I do mean fill it! This recipe is pretty perfectly sized to fill the front half of my mold up to the top.
Next, gently place some toothpicks into the head, ears, and neck of the lamb to create a little structural integrity.
Push ‘em down into the batter just a smidge. These toothpicks will ensure that you won’t accidentally decapitate your lamb during de-panning, decorating, or transport.

Place the back half of your mold onto the front and push it to secure.
To make sure things are extra secure, wrap the mold in baker’s twine around the body and the head so it’s tight, tight, tight.

Tips for baking the best traditional Easter lamb cake
Obviously, looking at this cake you can see the head area is much smaller than the rest of the body. That means it’s going to cook faster than the rest of the cake. The teeny, tiny ears even moreso.
Now, you can just throw it in the oven like this and be ok with an overcooked head and probably burnt ears. Or!
Wrap the head in a layer of tinfoil and then wrap the ears in a second layer of tinfoil to be sure that the entire cake cooks evenly and perfectly.

Baking & Cooling the Cake
Here comes the hard part (because none of what I’ve just told you has been hard up to this point, ok?): the baking.
You can’t see this cake. You can’t test this cake. There’s no inserting a toothpick into the center and seeing if it comes out clean. There’s only feeling it.
After you’ve baked your lamb cake, you’ll remove it from the oven and let it cool in the mold for at least fifteen minutes, or until it’s just barely warm to the touch.
That’s when you can remove its aluminum foil helmet, cut the baker’s twine, and gently pry the edges of the pans away from one another and release your lamb!
If you’ve properly sprayed and sugared your pans they should pull right away with little to no resistance. Set the lamb upright on a cooling rack (so that it looks like its sitting) and let cool completely to room temperature.

How to decorate an Easter lamb cake?
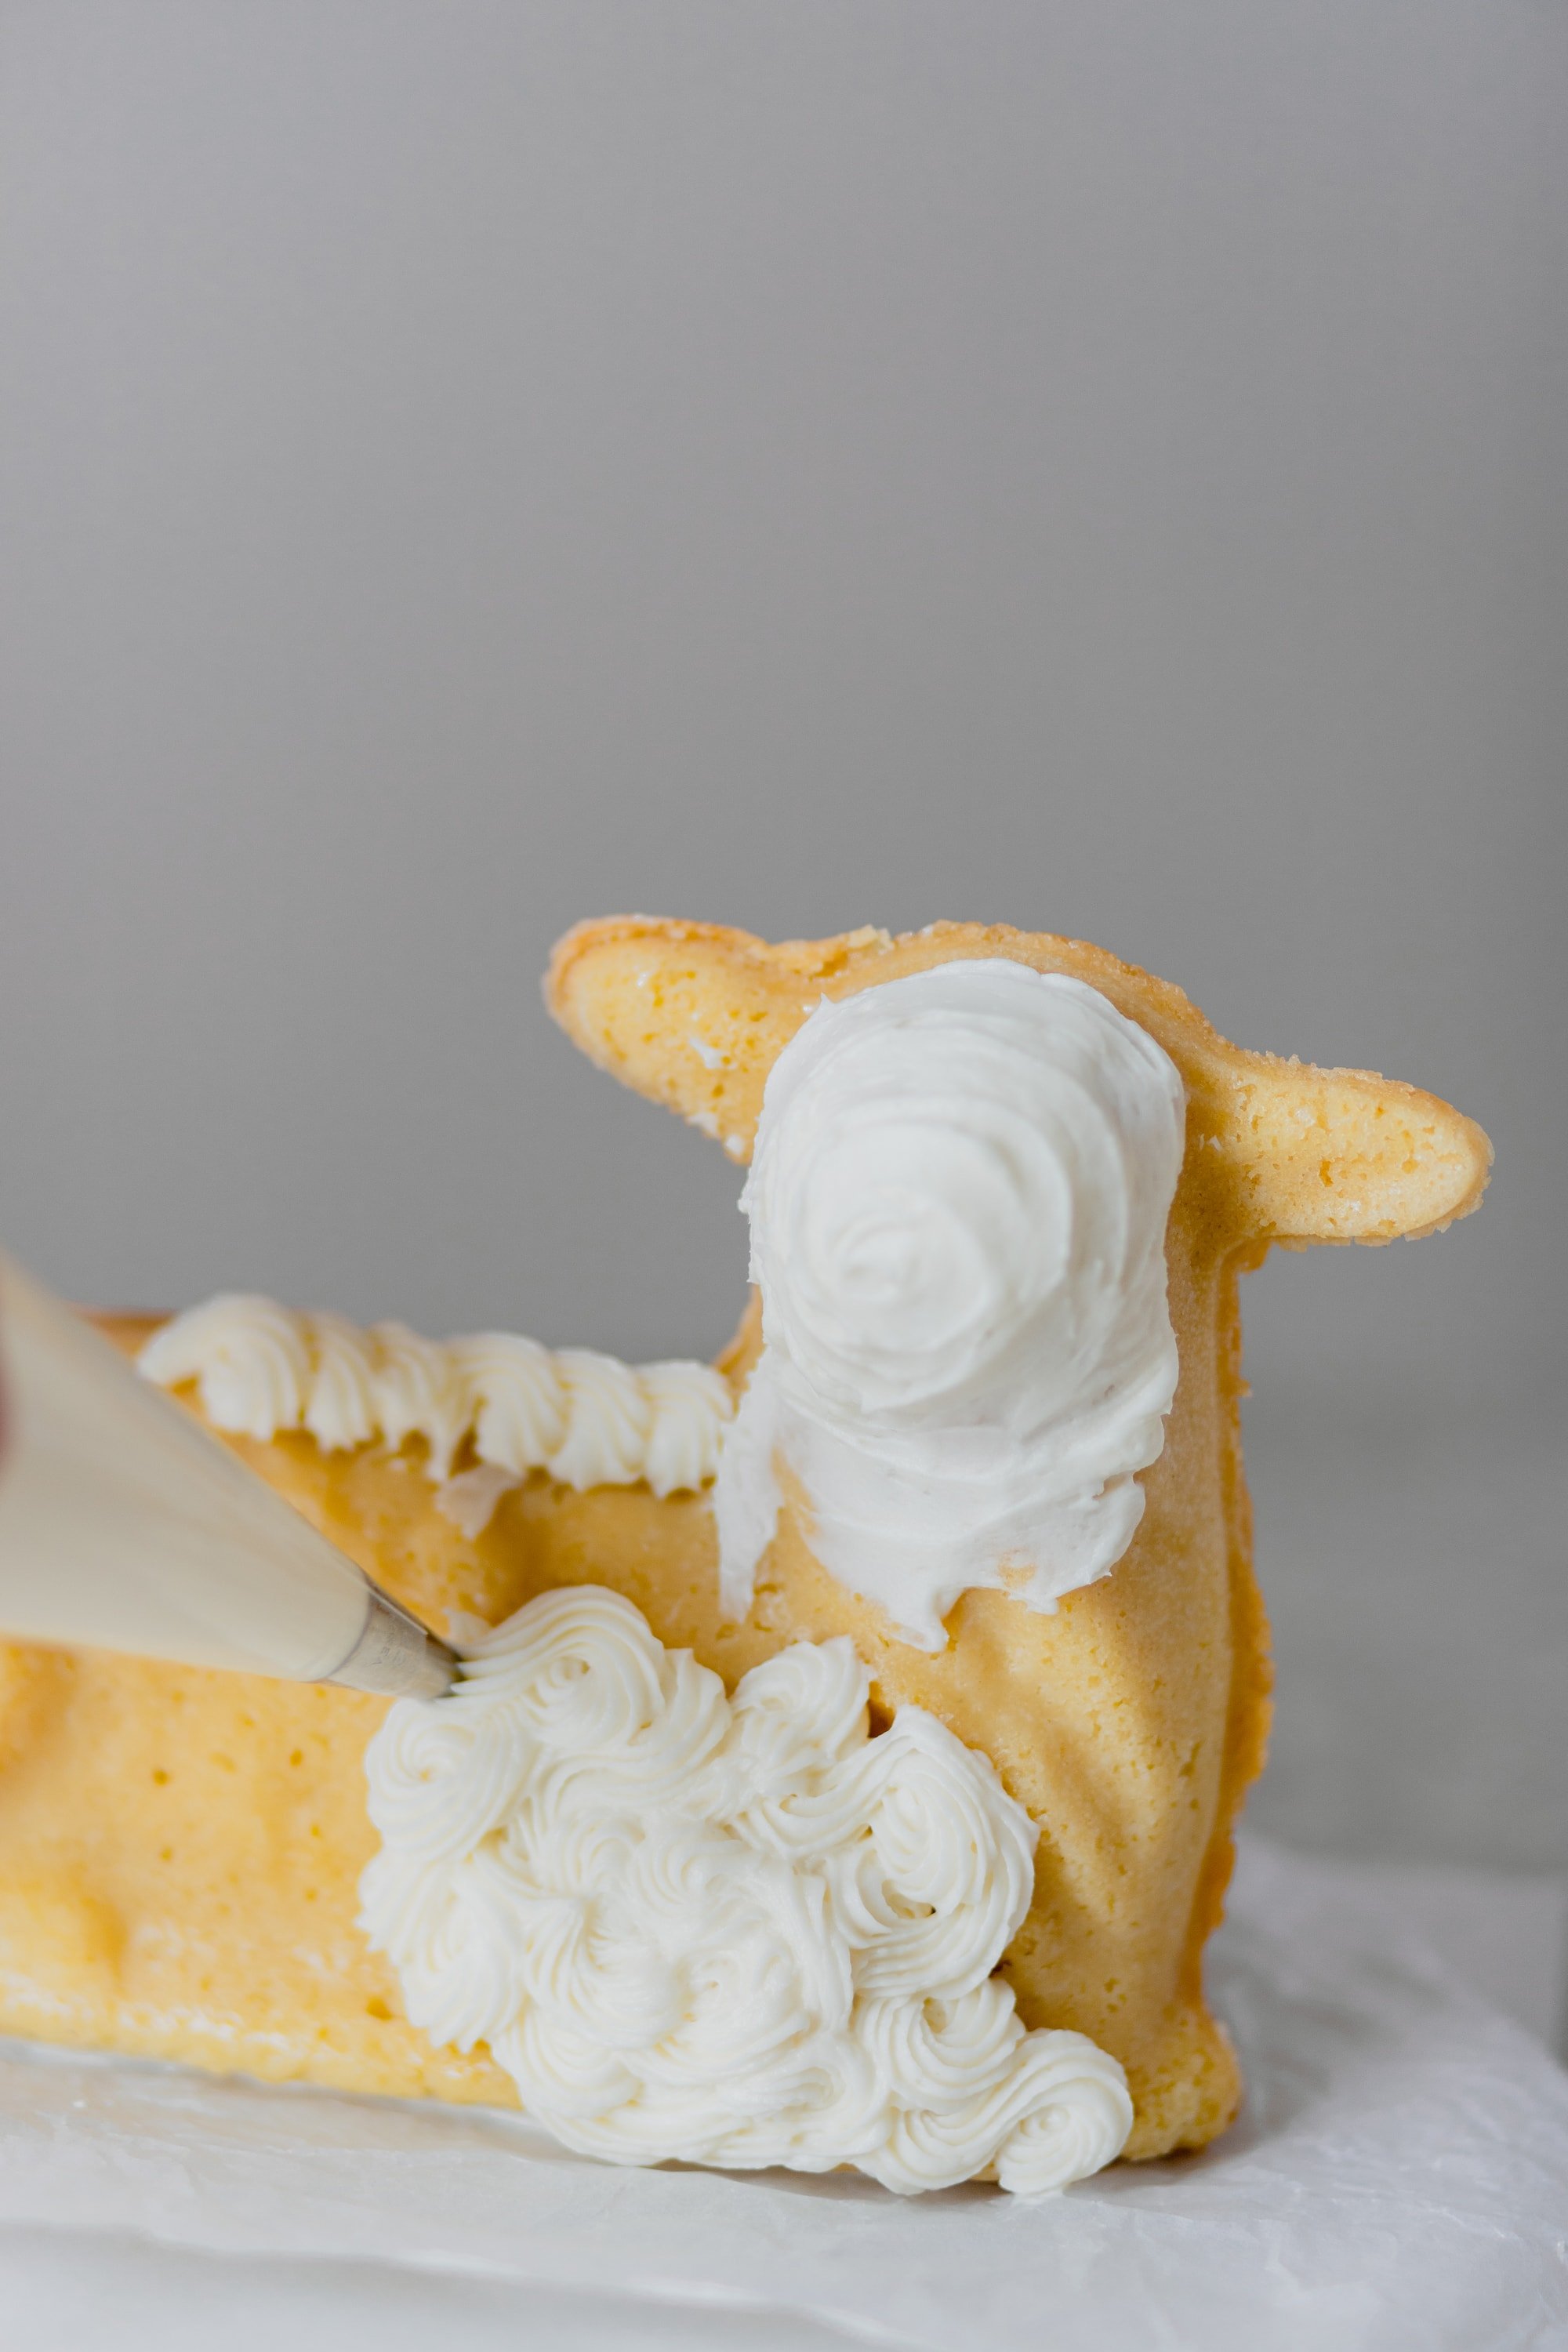
If necessary, trim that little “foot” on the bottom of your lamb that can sometimes appear from where the two seams of the mold meet. Spread a little frosting onto the bottom of your lamb and secure it on a serving platter.

Now, from here you can just freeform frost it and give the lamb jellybean eyes, or even coat it in coconut like my grandma used to do.
Or, you can get a little extra like me. First, spread a thin layer of frosting around the face area so you have a nice clean canvas to create a face on.

Then using a piping bag fitted with a Wilton 22 tip, pipe swirls and rosettes and stars all around the lamb in a very perfectly-imperfect way to create the “wool."
A smidge of brown and pink food coloring help create the prettiest eyes and nose you've ever seen on a cake!

I like to surround my lamb cake with coconut “grass” and jellybean accents because it’s so fun, kitschy, and cute.

Give this traditional Easter Lamb Cake recipe a try and let me know what you think and how you do! I believe in you!

Watch the recipe video!

Lamb Cake
Equipment
- Lamb Cake Mold
- Toothpicks
- Baker's Twine
- Aluminum Foil
Ingredients
For the lamb cake:
- 2 cups flour
- 2 ½ tsp. baking powder
- ¾ tsp. salt
- 3 large eggs, at room temperature, yolks and whites divided
- 1 cup sugar
- ½ cup shortening, such as Crisco
- 1 tsp. vanilla extract
- ¾ cup whole milk
For the frosting:
- ½ cup unsalted butter, at room temperature
- 4 ounces cream cheese, at room temperature
- 1 pound powdered sugar
- 2 teaspoons vanilla extract
- Pinch of salt
- 2 tablespoons whole milk
To decorate the cake:
- Brown food coloring (optional)
- Pink food coloring (optional)
- Shredded coconut (optional)
- Green food coloring (optional)
- Jelly beans (optional)
Instructions
For the lamb cake:
- Preheat oven to 375 degrees. Generously spray both sides of the cake mold with baking spray and dust liberally with granulated sugar (yes, sugar, not flour. Trust me). Shake out excess sugar if necessary.

- Whisk together the flour, baking powder, and salt in a small bowl and set aside.
- In the bowl of a stand mixer fitted with a paddle attachment cream together the shortening and the sugar until light and fluffy, about 5 minutes.
- Meanwhile, in a separate bowl with a hand mixer or whisk, whip the egg whites until thick enough to hold medium-stiff peaks, set aside.
- Add the egg yolks to the sugar mixture, one at a time, mixing well until fully incorporated, scraping down the bowl again as necessary. Stir in the vanilla extract.
- Working in two batches, add the dry ingredients and stir to combine, alternating with an addition of milk (so, it should go flour-milk-flour). Just before batter is completely mixed, gently fold in egg whites, being very careful not to deflate batter.
- Place the front end of the cake mold face side down on a baking sheet. Fill with all of the cake batter (it’s going to be really full). Place toothpicks inside the batter along the lamb's ears, head, and neck for added support.
- Place the back half of the cake mold over the top to seal. Tie together with butcher’s twine in a few places to ensure the mold will stay together (if you have one of the fancy cast iron ones that weighs a few pounds, this step isn’t totally necessary).
- Wrap the head of the cake mold in a layer of aluminum foil and the ears in a second layer of foil before baking in preheated oven for 50 – 55 minutes. Yes, there is no way to tell if the cake is done, you can’t peak, you can’t check, you can’t test. Truly, you just have to go with your gut. Oven temps vary – mine typically hitting at 52 minutes, though I’ve taken it to 55 for a very golden brown cake.
- When you feel ready, remove the cake from the oven (if there’s been a little cake batter overflow, don’t mind it, that’ll come off no problem). Cool cake in mold on a wire rack for 10 - 15 minutes, or until warm to the touch.
- Remove foil helmet and butcher’s twine. Starting from the bottom of the mold, gently press the front end of the mold into the cake (and away from the outer, back half, of the mold, to release the cake at the seam). Continue all the way around the mold to begin releasing the cake. At this point, you should feel the cake loosen and become free from the back half of the mold. Remove the back half of your mold. Flip cake over on the cooling rack and gently pry the front of the mold from the cake. Behold the beauty you have created.
- Cool cake completely on wire rack.


While the cake cools, prepare the frosting:
- In the bowl of a stand mixer fitted with the paddle attachment cream together the butter and the cream cheese until smooth, about one minute. Scrape down bowl before adding remaining ingredients.
- Working in quick pulses to avoid a powdered sugar explosion, begin to incorporate everything. Gradually increase speed once powdered sugar is incorporated and whip frosting until light and fluffy, adding more milk if necessary. (For this recipe I like a stiffer frosting so that it holds the shape of the decorations better, but if you’re going casual with the decoration, a softer frosting will do just fine.)
To decorate the cake:
- Take 1-2 tablespoons of frosting and color with a drop or two of brown food coloring. Place in a piping bag and snip the end off just a tiny amount. Repeat the process with the pink food coloring and another 1-2 tablespoons of frosting and set the prepared piping bags aside.
- Take your totally cool cake and, if necessary, trim off the ridge along the bottom of the cake where the seams met for the two sides of the mold. Place a thin line of frosting along the same area and secure cake to a platter or cake stand.
- Around the face area of the lamb, gently cover with an even layer of frosting to provide a canvas for creating the lambs face.
- Using a piping bag fitted with a Wilton 22 tip (or similar) randomly pipe swirls, rosettes, and stars of frosting around the body, head, and ears of the lamb to create the “wool.”
- To create the lamb’s nose and mouth: pipe a downturned pink triangle in the center of the face with a front facing “J” coming out of the bottom and to the left of the nose and a backwards “J” coming out and to the right.
- To create the lamb’s eyes: Carefully pipe two half circle shapes above and equidistant from either side of the lamb’s nose. Add lashes by simply touching the tip of the piping bag to the eye and dragging down. Clean up any messy areas with a toothpick.
- If you want to have your lamb laying in a bed of coconut “grass” simply dye 1 – 2 cups of flaked coconut with green food coloring and mix well with a fork before spreading around the platter of the cake. A few scattered jelly beans never hurt either.


Video
Notes
- I added the egg yolks into this recipe (even though the original doesn’t call for it), for some much-needed fat and moisture, however this does not produce a ridiculously moist and airy cake. She’s gonna be thick and dense, moreso like that Sarah Lee Poundcake you can get from the freezer section.
- Lamb cake is best served the day it’s made but can be kept, frosted, for an additional day if necessary.
Nutrition

Heather says
I made this for Easter and it was delicious! I love the sugar trick and as an experienced Bundt cake baker I will be trying that trick on my next Bundt.
Amanda Gajdosik says
Hi Heather,
Thrilled to hear you enjoyed my lamb cake - it's just not easter without it! And yes! The sugar trick is SO fun!!!
Happy baking,
Amanda
Wendy says
This worked beautifully! As a first time lamb cake baker, I watched the video and followed the recipe to a T- and it came out perfect. Thank you for the guidance!
Amanda Gajdosik says
Hi Wendy,
Yay! I knew you could do it! Thanks for rating and reviewing!
Happy baking,
Amanda
Linda says
This cake turned out awesome. It tastes great. I used lemon flavoring instead of vanilla. The lamb came out of the mold perfectly. The trick was spraying the pan and using auger to coat the pan. I followed the recipe exactly.
Amanda Gajdosik says
Hi Linda,
Love the lemon twist on this! That would be so fresh and delish for spring! So glad you enjoyed it 🙂
Amanda
Marge says
Hi Amanda just came across this recipe and I’m making it won’t daughter, I’m a little confused with the recipe about the frosting it calls for 1/2 cup of butter but it looks like you put two sticks of butter, isn’t one stick a half of cup?
Thanks
Marge
Amanda Gajdosik says
Hi Marge,
In the video I made a double batch because I always like to have extra frosting on hand lol!
Amanda
Lee Chassee says
The video looks like you used 2 sticks of butter and a whole packet of cream cheese but the recipe says 4 oz. cream cheese and 1/2 c. butter. Does it matter? Do you need the extra frosting for the cake? Thanks..
Amanda Gajdosik says
Hi Lee,
I like to make a double batch of frosting to have extra on hand - it's great for graham crackers! I hope you were able to frost and enjoy the cake for Easter!
Amanda
Mary says
This is great and brings back so many memories..I'm 73 and my grandma used to make these every Easter with the coconut!!. I used a white box cake and forgot to put in the toothpicks, but it's ok.. haven't iced it yet. Thankyou for making some good memories for me!!
D says
Tried your recipe and technique for the lamb cake. The cake came out very nice. I did use olive oil spray and sugar kind of reluctantly. But it worked. It molded great and came out sturdy and a golden brown. I tied the mold, used aluminum foil on head and ears as directed. But it did leak out although tied. Mixed the cake recipe as directed but not to offend the cake was not tasteful to us, only my husband liked it. Not sure what I did wrong. It was probably my fault somehow.
I asked others what they do and it’s much more simple. They use a moist cake mix which is too much I guess for the mold so they make cupcakes with the excess. Do not do any of the other steps except add sturdiness to the ears and neck and it comes out good. Over all I greatly appreciate your expertise. It all depends on how much time you want to put into it. What matters is what’s important to the person and perhaps the tradition of it. I am going to experiment with some different recipes. God bless!
Elizabeth A says
This recipe is perfect. Trussing the pan and the aluminum helmet, amazing! My family was a bit disappointed (yet super impressed) that the cake was a success, they we’re expecting another ‘nailed it’ fail.
Amanda Gajdosik says
Hi Elizabeth,
Ha! That is so funny! I'm honored that my recipe could be a fool-proof method for you to make a lamb cake this year for your family! Even if they were hoping for a disaster 🙂
Amanda
Scott J says
Ok, so I know this isn’t a gluten-free blog, but…I have a daughter that wanted a lamb cake this year. I had told my kids about having them when I was a kid; one of my dad’s patients would make one for us every year. I used a GF all-purpose flour mix at just a scant 2 cups-not quite to the line mixed with 1/2 tsp xanthan gum. Baked it for 54 minutes…perfect and yummy! Also I didn’t use toothpicks (because I didn’t have them) but opted to run a popsicle stick down the center to head through the neck after the cake cooled. From a former Wisconsinite, thank you! Easter blessings!
Amanda Gajdosik says
Wow Scott, I am SO HAPPY this turned out for your kids to enjoy! Thank you for making Midwest Nice a part of your Easter celebration 🙂
Amanda
Marieanne Verano says
Everything turned out just as you said however, I could not decorate the lamb by piping. I tried putting it in the freezer but it was too warm in my kitchen as daughter was baking her cookies, too. It was fun being able to reuse a mold I’ve had for over 40 years and my MIL owned it before me. Happy Easter.
Amanda Gajdosik says
HI Marieanne,
Yeah, there are just some environmental factors that prevent proper frosting sometimes! I am a person with "hot hands" and have to be very careful when icing cakes - this Lamb mold included! So happy the cake recipe turned out for you, though!
Happy Easter 🙂
Amanda
Krystle says
Since moving to TX from the Midwest I've been looking for a great lamb cake recipe and I finally found one. I tried Midwest Nice's recipe, super easy and came out perfect. Lamb fully intake. My 6 year old daughter loved decorating it. Don't be afraid to try this recipe it's easier than it looks. Thanks Midwest Nice for a great recipe we will use for years to come!
Amanda Gajdosik says
Hi Krystle,
Thank you so much for your kinds words. So, so happy you were able to enjoy a piece of the Midwest in TX. And that your kiddo could make memories, too! Thank you for rating and reviewing, I so appreciate it! 🙂
Amanda
Suzanne says
When I saw the lamb tattoo, I knew you were serious about your lamb cake and had to try your grandma's recipe in my grandma's lamb pan! It came out great. Loved the frosting too! Note for readers: lamb molds come in different sizes. Mine is about 7" long, 3" wide and 3.5" high (+ another 2" for the head). It also bakes vertically on a stand, head down and belly up with the belly open to air. If yours is about that size, this is way too much batter, but not enough for 2 lambs. Put about 2/3 of it in the mold. I used 3/4 of it and that was too much, my lamb looked like she was about to give birth to a litter!
Amanda Gajdosik says
Hi Suzanne,
LOVE hearing that this turned out so well for you. AND that you were able to deduce the size differences in the pans. That is a tricky thing when working with vintage pans and recipes, things weren't all standard 50 years ago! For future note, uou can always bake the remaining cake batter in little ramekins or small bread pans. Even a mini bundt pan?! So fun.
Thanks for your review and Happy Easter!
Amanda
Sarah says
If I don’t have shortening, could I substitute a stick of room temp butter
Amanda Gajdosik says
Hi Sarah,
Yes! You can! I have made this cake with butter before and it isn't quite the same as my grandma's but still very good! The shortening also helps to keep the lamb "white" where the butter will give the cake a yellow hue. But that's not a problem, is it?
Hope this helped 🙂
Amanda
Francie T. says
I used the cooking spray and dusted with sugar and it turned out perfectly! I love it!
Amanda Gajdosik says
Hi Francie,
YES! Love to hear that this hack worked for you! I think it makes the lamb cake that much more special (and easier to make)! Have a very happy Easter 🙂
Amanda
Mary says
Ok- maybe I missed something - but what happens to the toothpicks that you put in for stability?? I didn’t see where or how they are removed??
Amanda Gajdosik says
Hi Mary,
The toothpicks don't get removed. They have to remain in the cake to keep the head and ears stable (especially during frosting/decorating). Just be cautious when serving/eating the head to be mindful of their presence.
Happy baking!
Amanda
Mary says
Thanks for the quick try as zi am making it now!!!! I’ve had the Wilton mold for over 25 years but haven’t used it for such a long time so appreciate your recipe and tips!!!!
Cindy says
Can this cake be frozen.. before it’s frosted?
Amanda Gajdosik says
Yes! Very carefully and thoroughly wrap the cake in two layers of plastic wrap, making sure the entire cake is very well covered and wrapped. Thaw the cake completely in the fridge overnight before frosting and serving! (You might consider brushing the cake with a light coat of simple syrup (I have a recipe for that on my site as well!) before frosting to add a bit of moisture back into the cake.) Enjoy!
Madyn says
This recipe was the real deal. It was my first time ever making a lamb cake, let alone a cake in any type of mold, and it was PERFECT. I did everything as she said to a T and it turned out so well! Also the frosting is amazing.
Amanda Gajdosik says
I'm SO HAPPY to hear this lamb cake recipe turned out so well for you, Madyn! My grandma really knew her stuff! 🙂
jo says
i read that if you use crisco for buttering pan and cornmeal instead of flour it will work exceptionally well. and it did! better than butter and flour any day. try it you will be amazed.
Amanda Gajdosik says
I've never tried that. How interesting!
Stina says
Sorry, but that whole spray Oil and sugar coating for the pan did NOT work for me. My whole cake was stuck to the pan and completely ruined. I’m gonna just go ahead and say that the butter/floured pan as a tried and true solution is gonna be my go-to.
Amanda says
I'm so sorry that spraying the pan and coating it in sugar didn't work for you Stina! It has always worked for me with this lamb cake (and in many bundt cakes too, with their fancy designs). I sure hope you give the cake recipe another go with a buttered and floured pan - as it really is a delicious recipe! Thank you for your comment!